Introduction
The support dashboard has a prepared restricted account, but still connects through Redis's broad default account. You will switch its configuration and retire that old connection path while preserving the monitor.
This independent environment includes the dashboard account from the previous lesson. You need only the Redis commands and ACL concepts taught there. Each application operation opens a fresh connection, so the next request uses the current configuration.
Establish the Fresh Application Baseline
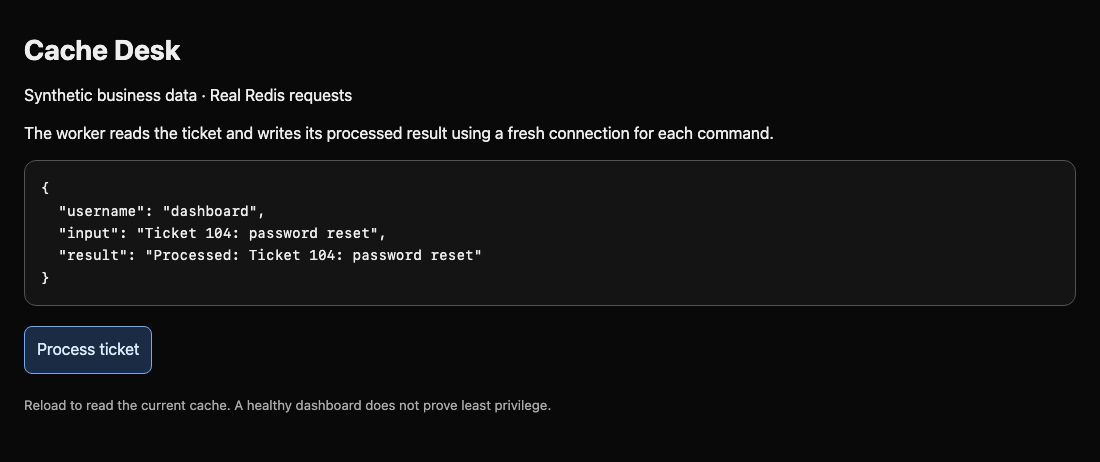
In this step, you will establish normal operation in this new environment. Switch to the Dashboard tab. The input is Ticket 104: password reset, the result is empty, and the username is default. Click Process ticket. Confirm Processed: Ticket 104: password reset appears.
Select the Dashboard tab in the lab interface to begin this step.
Switch to the Client tab to read the private application configuration. cat prints the file. The terminal starts in /workspace, the application's configuration directory:
Switch to the Client tab before running the following command.
cat app.json
JSON stores named fields inside braces. username identifies the Redis user and password supplies its authentication secret. String values sit inside double quotes; commas separate fields. The current username is default and the password is empty.
The application reads this file again for each request and opens fresh Redis connections. You do not need to restart or write client code. A separate monitor account reads monitor:heartbeat; keep it usable when changing the default account. Configuration files contain secrets, so the supplied file is private rather than publicly served.
Switch the Dashboard Connection
In this step, you will make the application use the restricted account. Switch to the Client tab. Replace the two-field configuration. cat > app.json redirects the following text into the file, replacing its old contents. The quoted EOF starts a here-document; paste all lines, including the final EOF, on its own line. Quoting prevents shell expansion inside the JSON.
Select the Client tab in the lab interface to begin this step.
Switch to the Client tab before running the following command.
cat > app.json <<'EOF'
{"username":"dashboard","password":"Dash-Lab-42"}
EOF
Only the configuration changes. This account already has GET/SET permission under support:* in this fresh snapshot. Switch to the Dashboard tab and refresh the page, check the displayed username is dashboard, then click Process ticket again. A result left over from the old account is insufficient; this new operation proves the configured account can read and write.
If the page reports WRONGPASS, switch back to the Client tab, correct the JSON credentials using the complete block above, then switch to Dashboard and retry Process ticket. If it reports NOPERM, switch to the Cache Server tab and run cache-admin ACL GETUSER dashboard to inspect the key pattern and commands. The complete reset command from the first lab can recover a mistaken account. For malformed JSON, switch to the Client tab and repeat the complete configuration block above; then return to Dashboard to retry.
Do not use maint as a shortcut: the application must have its own bounded account.
Retire the Broad Default Entry
In this step, you will disable the automatic default path without disabling legitimate accounts. Switch to the Cache Server tab. The maintenance account used by cache-admin remains enabled, so administration stays available.
Select the Cache Server tab in the lab interface to begin this step.
ACL SETUSER default off prevents new authentication as the default user. Save the active change to the configured ACL file:
Switch to the Cache Server tab before running the following command.
cache-admin ACL SETUSER default off
cache-admin ACL SAVE
Both commands return OK. Switch to the Client tab and try a fresh connection without credentials:
Switch to the Client tab before running the following command.
redis-cli -h cache-server GET support:ticket
Expect NOAUTH Authentication required. This is the intended rejection. It differs from NOPERM, which means an authenticated account lacks permission. Every invocation here makes a new connection. Turning a user off does not promise to terminate already authenticated sessions; active-session revocation is outside this exercise.
Switch to the Dashboard tab and refresh the page and click Process ticket. Its named account should keep working. If you disabled the wrong account, switch to the Cache Server tab to repeat its correct reset rule, then save again. Do not re-enable the broad default account just to hide an application configuration error.
Test Security and Availability Together
In this step, you will compare allowed work, forbidden data, and an unnecessary command. Switch to the Client tab. At each --askpass prompt enter Dash-Lab-42.
Select the Client tab in the lab interface to begin this step.
Switch to the Client tab before running the following command.
redis-cli -h cache-server --user dashboard --askpass GET support:result
The processed support result remains readable. The next command intentionally asks for unrelated finance data:
redis-cli -h cache-server --user dashboard --askpass GET finance:payroll
Expect NOPERM. CONFIG GET reads server settings; even that administrative read is unnecessary for this application. The quoted star asks for all setting names and must reach Redis unchanged:
redis-cli -h cache-server --user dashboard --askpass CONFIG GET '*'
Expect a command-permission NOPERM. Now use the existing monitor identity and enter Monitor-Lab-42 at its password prompt:
redis-cli -h cache-server --user monitor --askpass GET monitor:heartbeat
Expect healthy. Disabling every account or stopping Redis would break this positive test and is not a repair. Switch to the Cache Server tab. Display the active ACLs and saved file:
Switch to the Cache Server tab before running the following command.
cache-admin ACL LIST
cat /data/users.acl
The saved entries should match the active entries, including default off. If they differ, repeat cache-admin ACL SAVE. Switch to the Dashboard tab and click Process ticket once more. Real availability plus meaningful denials establishes the result; a green page alone cannot establish least privilege.
Summary
You switched the actual application to its restricted Redis account, disabled fresh default access, persisted the ACL, and checked both prohibited requests and legitimate business/monitor operations. The checks use new connections; they do not claim existing-session revocation.